Introduction Last updated: 2021-10-01

Section intro goes here. Lorem ipsum dolor sit amet, consectetur adipiscing elit. Quisque finibus condimentum nisl id vulputate. Praesent aliquet varius eros interdum suscipit. Donec eu purus sed nibh convallis bibendum quis vitae turpis. Duis vestibulum diam lorem, vitae dapibus nibh facilisis a. Fusce in malesuada odio.

Section Item 1.2

Vivamus efficitur fringilla ullamcorper. Cras condimentum condimentum mauris, vitae facilisis leo. Aliquam sagittis purus nisi, at commodo augue convallis id. Sed interdum turpis quis felis bibendum imperdiet. Mauris pellentesque urna eu leo gravida iaculis. In fringilla odio in felis ultricies porttitor. Donec at purus libero. Vestibulum libero orci, commodo nec arcu sit amet, commodo sollicitudin est. Vestibulum ultricies malesuada tempor.

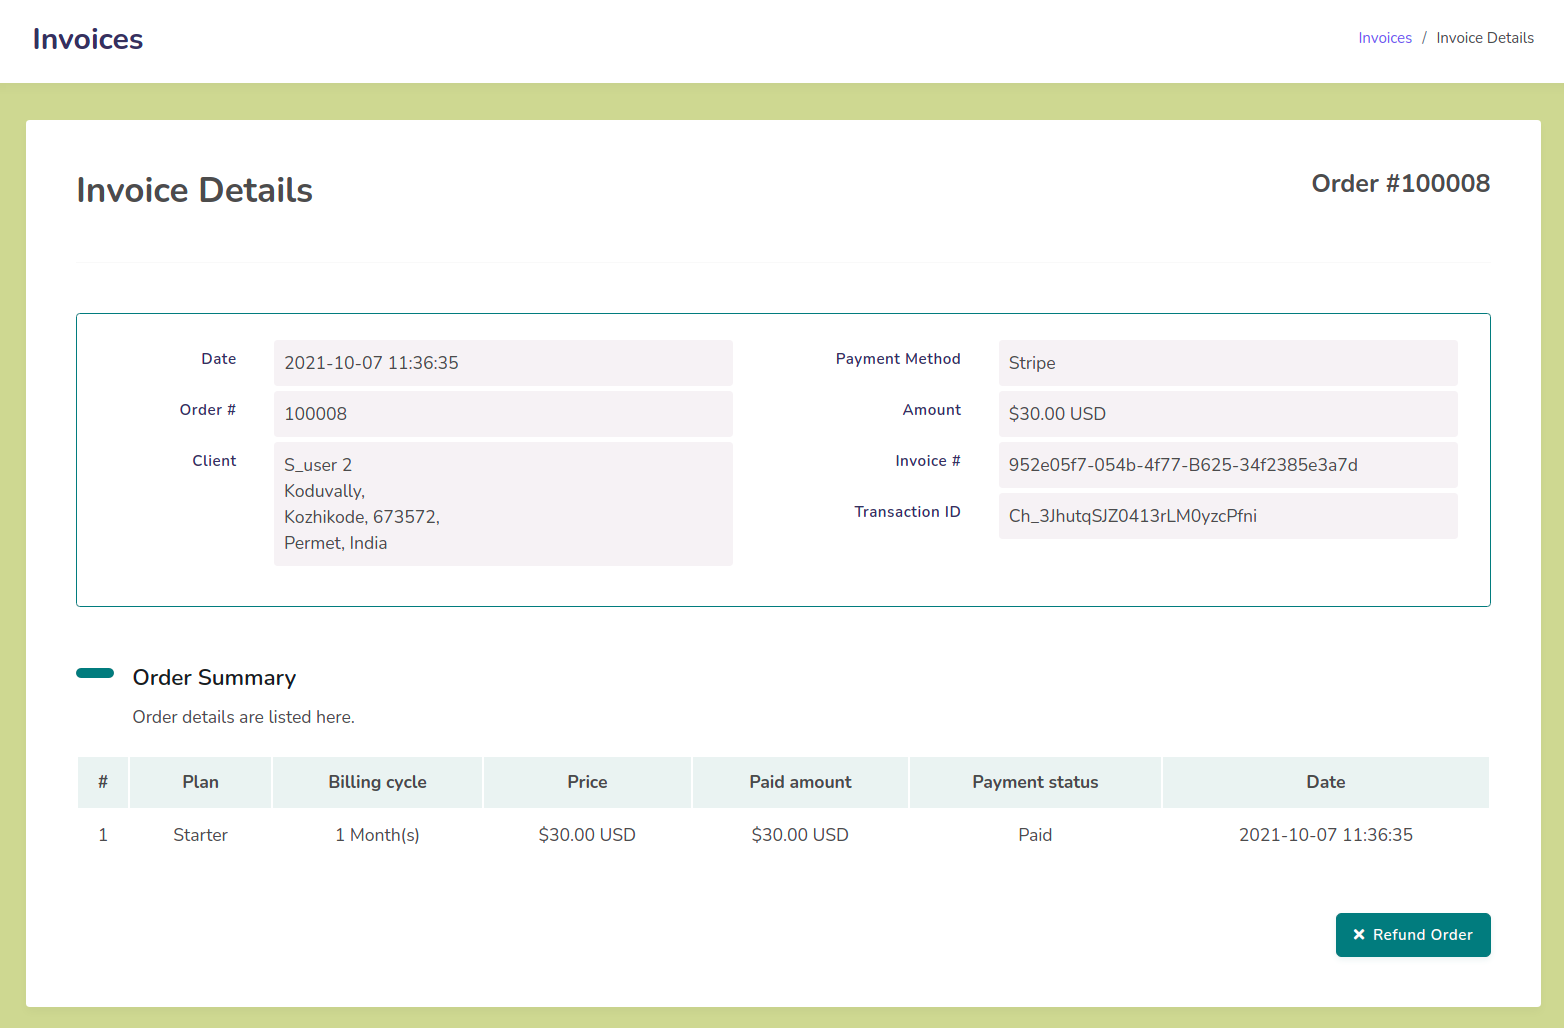
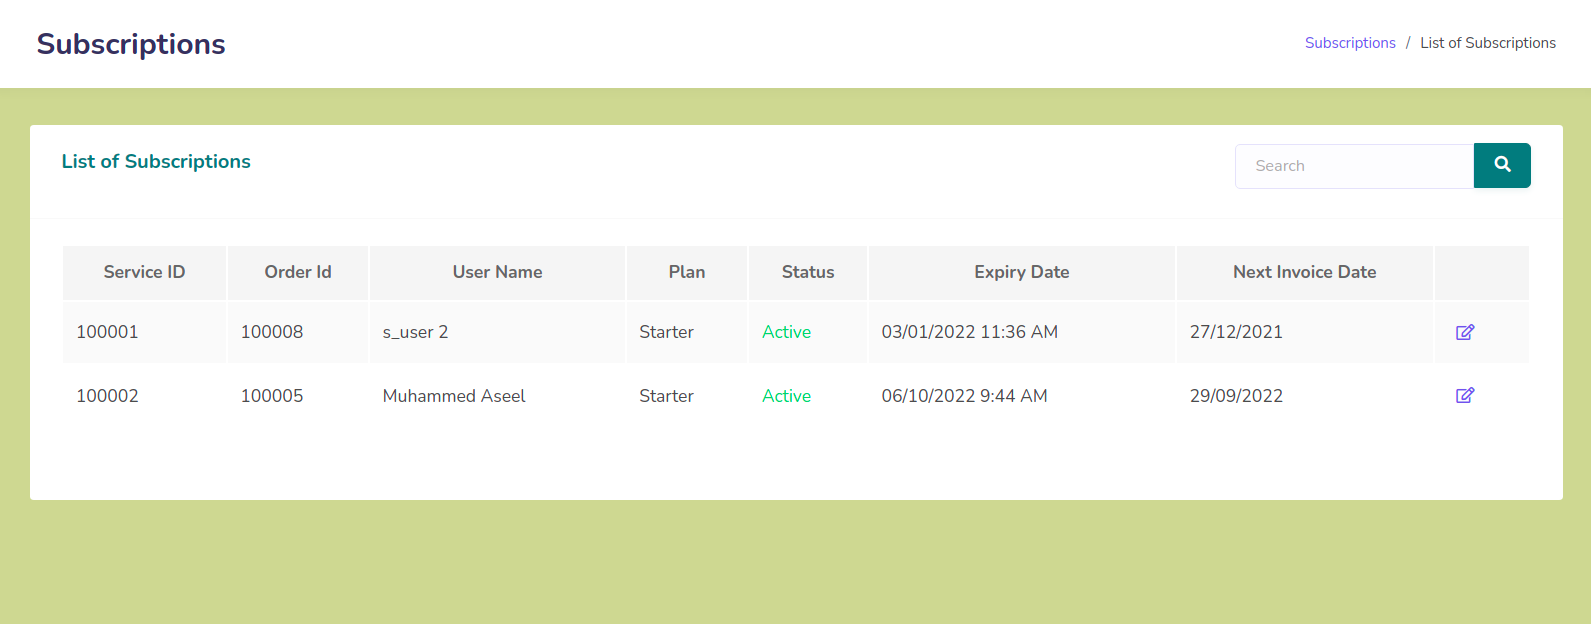
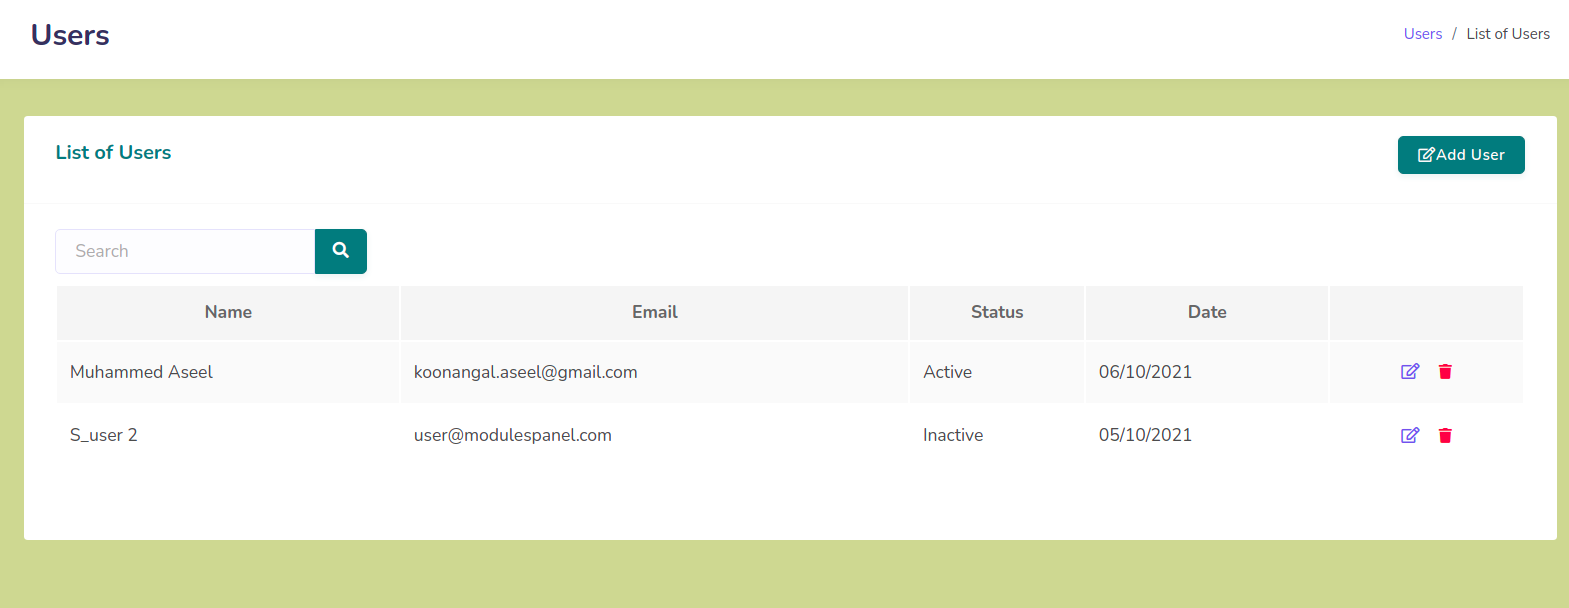
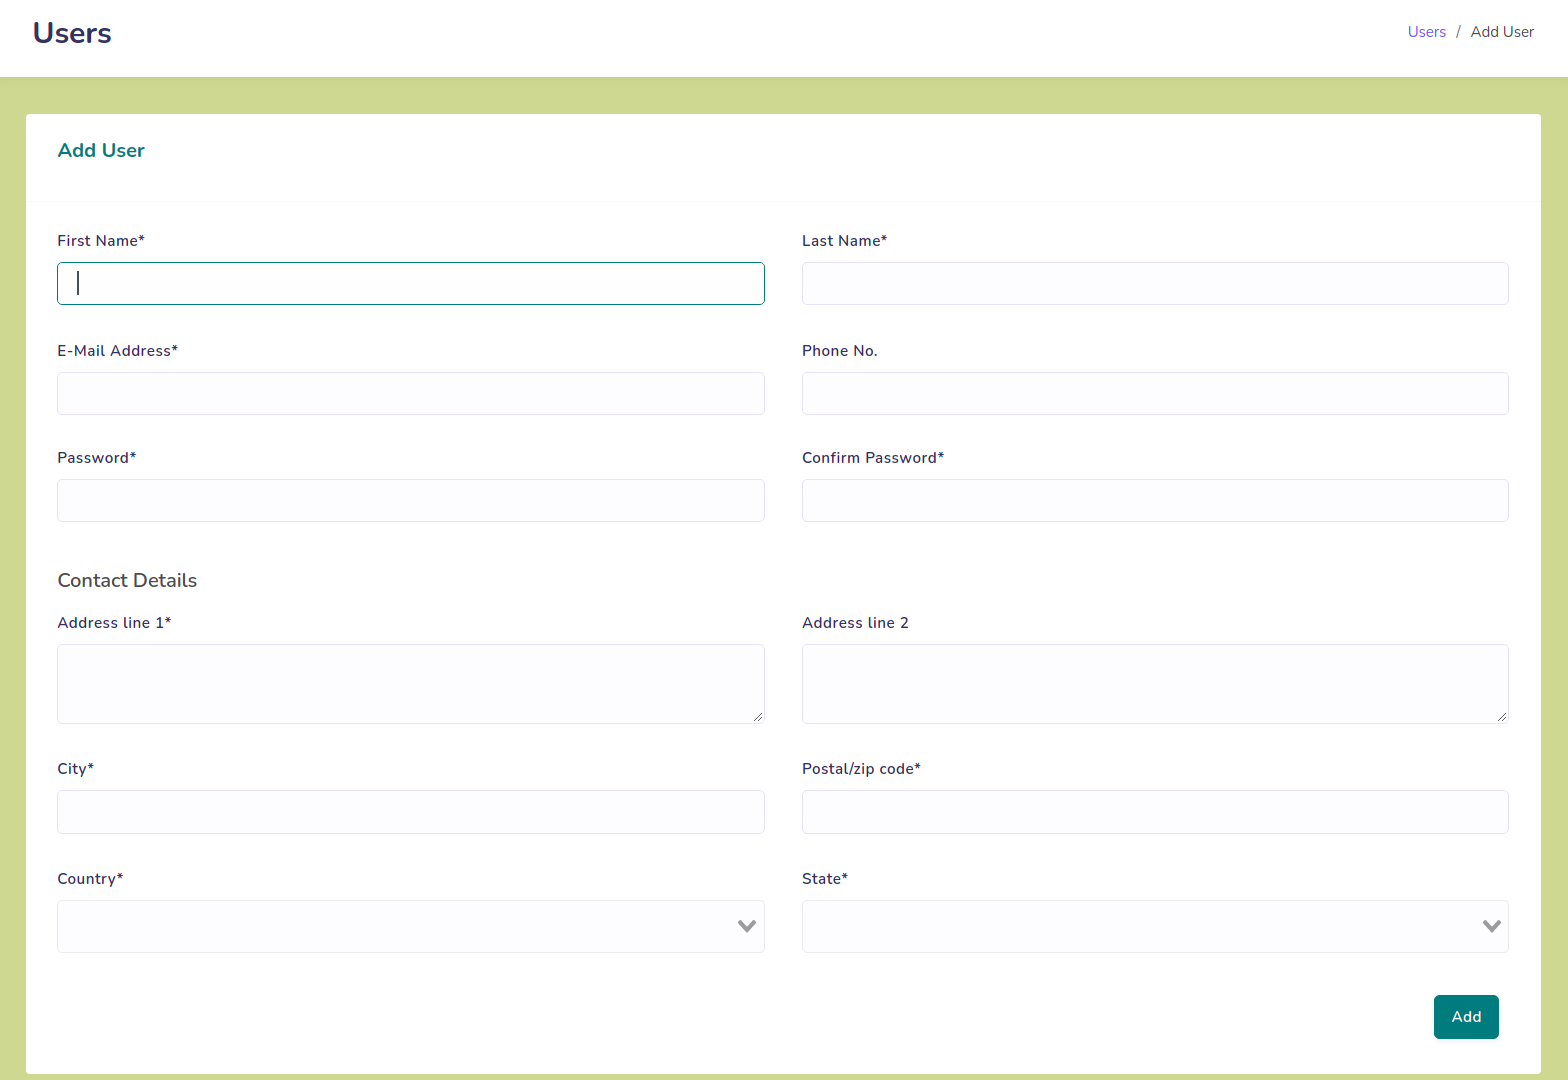
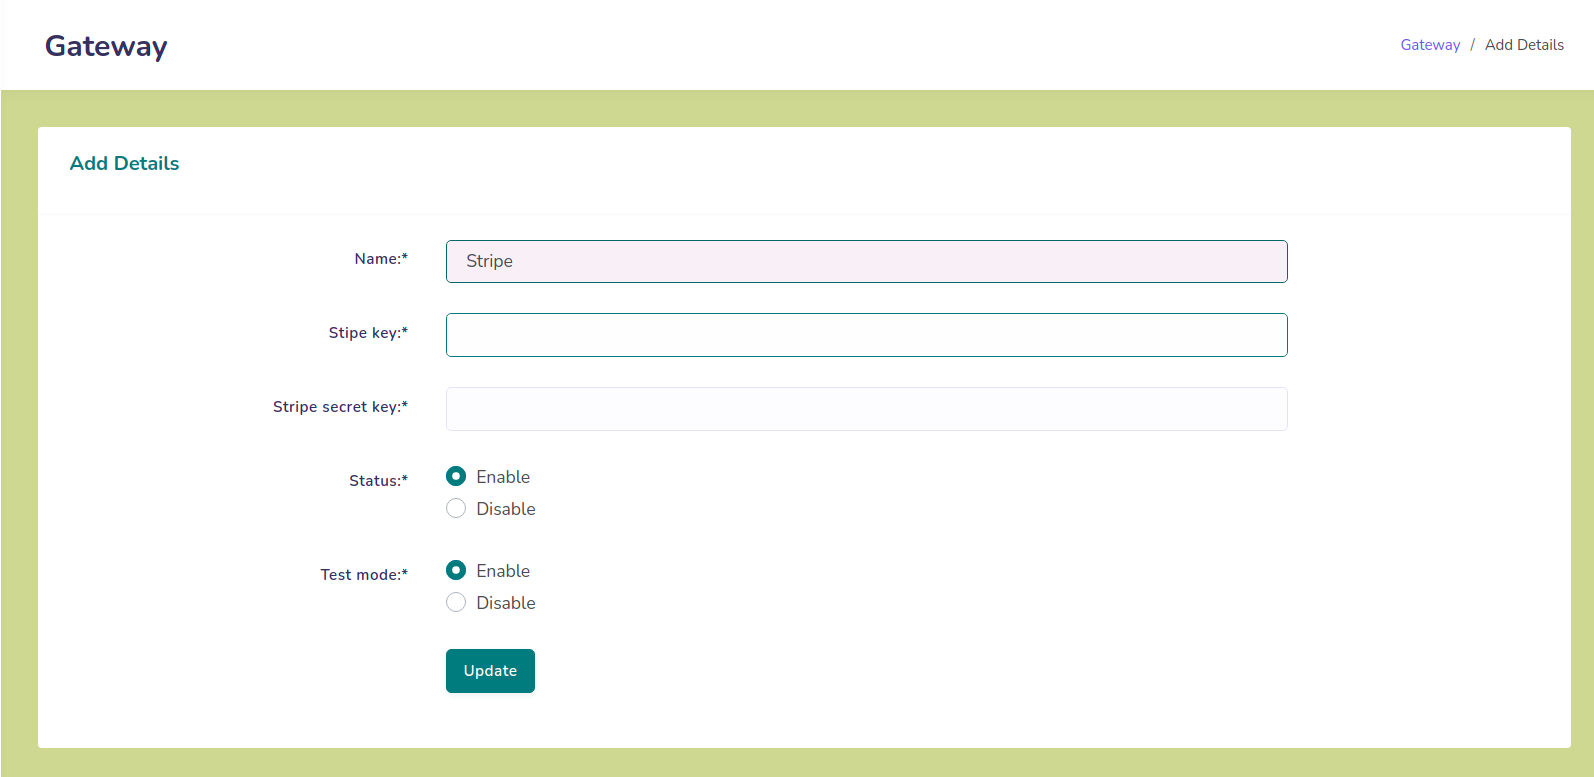
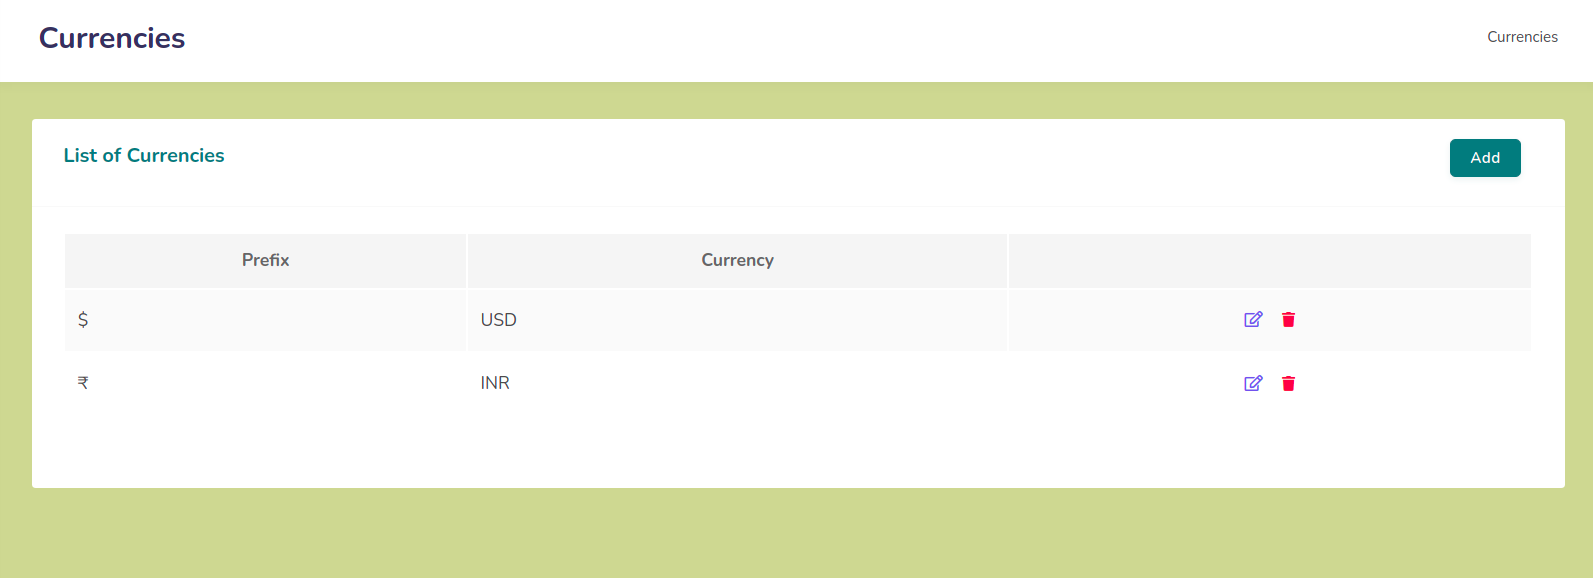
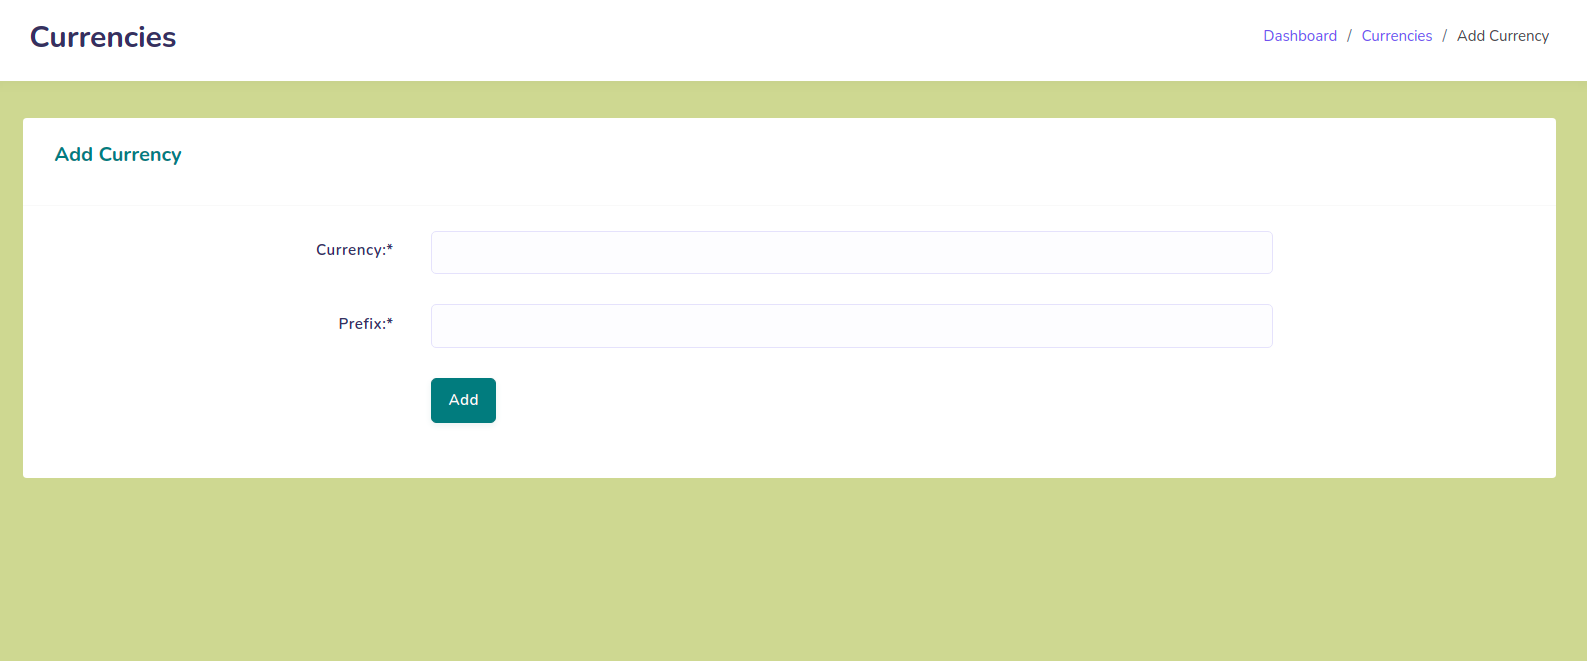
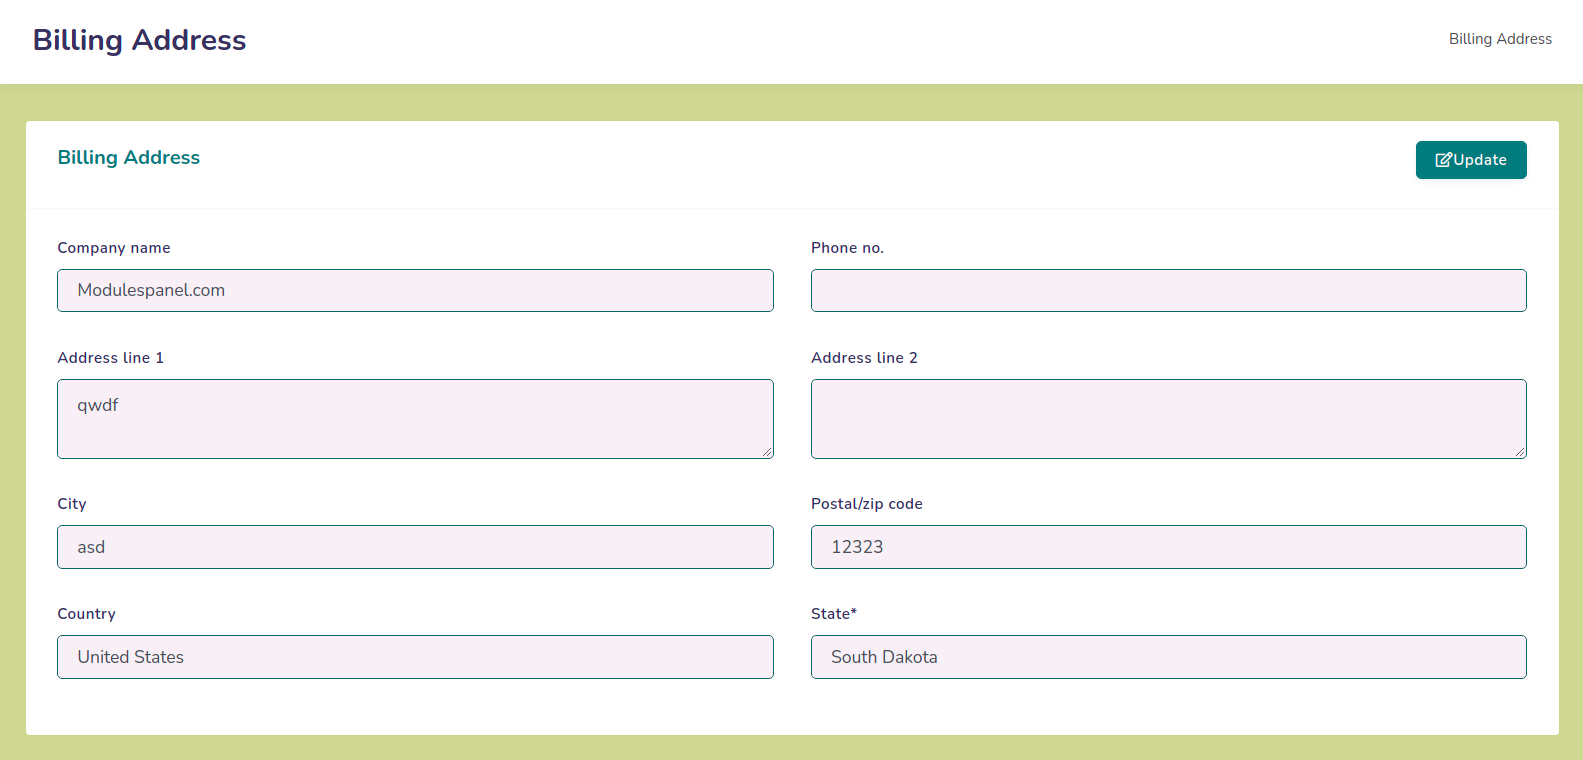
Image Lightbox Example:

2. Dashboard

Dashboard view:
Fig.2.1 Dashboard

The admin is provided with a dashboard which gives the order statistics, Income statistics and count of Tenants very quickly.

  • The admin can get the detailed income statistics from the dashboard. It includes total income, current day income, last month income and last yer income separately for each currencies.
  • The count of total orders, total paid orders and total trial orders are given in the dashboard. Last 5 orders are also listed here.

3. Tenants

List of tenants:
Fig.3.1 List of tenants
  • The admin can get the list of tenants from the "Tenants" link provided in the panel.
  • The admin can get the sub domain, registered user and the current status of the tenant from this page.
  • The link to edit a tenant is provide in each tenant. They can activate or inactivate the tenant from the edit page of the tenant.

4. Orders

List of orders:
Fig.4.1 List of orders
  • The admin can get the order details from the "Orders" link provided in the panel.
  • All the orders are listed here in the order of latest first.
  • The admin can get the order ID, ordered user details, gateway details of the order and the amount details from this page.
  • Orders are created before the payment is completed. So, the admin have to accept each orders after verification. Otherwise users can't use the features properly.
  • The status of orders created without a payment will be "fresh".
  • An order confirm Email will be sent to user's email id after accepting an order.

5. Invoices

List of invoices:
Fig.5.1 List of invoices
  • The admin can get the list of invoices by clicking the "Invoices" link provided in the panel.
  • From the invoices page, admin can get the order ID and user details associated with the invoice, amount and payment status etc.
  • The admin can filter the invoices by searching with order ID or user name.

5.1 Invoice Details


Invoice details page:
Fig.5.2 Invoice details page
  • The detailed information of an invoice can obtained by clicking on the order IDs provided in each invoices.
  • The admin can get all data associated with the invoice including transaction details and plan details.
  • The admin can refund the full amount of the transaction to users by clicking on the refund button given in this page. The amount will be refunded in the same transaction method of the payment. please confirm all details including bank statement twice before doing this!

6. Subscriptions

List of subscriptions:
Fig.6.1 List of subscriptions
  • The admin can get the list of subscriptions of users from the "Subscriptions" link provided in the panel.
  • They can obtain the data like order Id associated with the service, user details, plan details and status etc from this page.
  • From the edit page, the admin can change the status of the subscription. Also there is an option to add grace period to a subscription. Note that the grace periode should be added before expiring the subscription.
  • There is search option is provided in this page also. Admin can filter the subscription list by service ID, Order Id and username.

7. User Management

List of users:
Fig.7.1 List of users
  • The admin can get the details of all users registered with the system using "Users" link provided in the panel.
  • They can Add, Edit or Delete the users from this sections. Also they can get the current status of the user.
  • From the listing page admin can search users with their name or Email address.

7.1 Add a User


Add user page:
Fig.7.2 Add user page
  • The admin can add a user by clicking "Add User" link provided in the users page.
  • They should provide first and last name of the user, Email address, password and address details of the user.
  • User have to verify their email address when they login at first time.
  • After adding a user, the default status of user will be "Active". Admin can change this status from update user page accordingly.

7.2 Update a User


Update user page:
Fig.7.3 Update user page
  • The admin can update a user by clicking on edit link provided in users page.
  • They have to provide their updated details as done in the add section.
  • One extra option will be status. They can update the status of a user from this page.

8. Plans Management

List of plans:
Fig.8.1 List of plans
  • The admin can manage the available plans by the "Plans" link provided in the panel.
  • They can Add, Edit or Delete a plan from this page.
  • The green tick and red cross indicates the active and inactive states of the plan respectively.

8.1 Add a Plan


Add plan page:
Fig.8.2 Add plan page
  • The admin can add a plan using "Add Plan" link provided in the plans page.
  • They should provide the name, description, allowed department count, max. number of users, staffs and tickets of the plan in the corresponding area. They can choose unlimited options by checking unlimited checkbox.
  • Plan should be enabled to make it visible to the users.

8.2 Update a Plan


Update plan page:
Fig.8.3 Update plan page
  • The admin can update a plan using edit link provided in plans page.
  • They should provide the updated details of the plan as done in add section.
  • In addition to that, there is tab provided to add pricing for the selected plan.

8.3 Pricing Details


Pricing details:
Fig.8.4 Plan details
  • The admin can add pricing for each plans by clicking pricing link provided in the plan update page.
  • By clicking on it, they can see the list of pricing that already added for the current plan.
  • In this page there are links provided to add or delete pricing of the plan.

8.3.1 Add/Update Pricing

  • The admin can add pricing for each plans by clicking add link provided in the pricing page.
  • The admin should select a term, periode price and currency for the pricing from here.
  • Admin can also edit or delete thr pricing by clicking curresponding links from pricing page.
  • In order to add a pricing, there must be at least one currency added in the currencies page.

  • Fig.8.5 Add pricing

9. Gateways

List of gateways:
Fig.9.1 List of gateways
  • The available gateways and it status are listed in the gateways section in admin panel
  • The admin should provide the gateway details for each gateways.
  • There are currently 3 gateways are provided in this version. Paypal, Stripe and Mollie gateways
  • The admin can't add a new gateway to the system. If it required, they have to contact the developer team directly.
  • In-order to activate a gateway, admin should update his billing address in the system. Note that while adding the billing address, you have to provide country that accepts USD currency (Must not be India). Refer section 10.2
  • The green tick and red cross indicates the active and inactive states of the gateways respectively.

9.1 PayPal


Add PayPal API details:
Fig.9.2 Add PayPal API details
  • PayPal is a secure simple gateway for payments.
  • To activate this gateway in this system, Admin should crate a PayPal account and should provide it's API details in the system.
  • For PayPal you have to provide PayPal Email address, and PayPal API credentials such as API username, API password, and API signature of the account. Note that your details are secure with this system.
  • You can test the payments by enabling the test mode from the system. After the testing, don't forget to turn off the test mode from this section.
  • Also, the admin can enable or disable this gateway from this section. The gateway will not be available for users if it's not activated.

9.2 Stripe


Add stripe API details:
Fig.9.3 Add stripe API details
  • Stripe is also a secure payment gateway provided in this system.
  • To activate this gateway in this system, Admin should crate a Stripe account and should provide it's API details in the system.
  • For Stripe you have to provide stripe key and stripe secret key of your account. Note that your details are secure with this system.
  • You can test the payments by enabling the test mode from the system. After the testing, don't forget to turn off the test mode from this section.
  • Also, an admin can enable or disable this gateway from this section. The gateway will not be available for users if it's not activated.

9.3 Mollie


Add mollie API details:
Fig.9.4 Add mollie API details
  • Mollie gateway is also a secure payment gateway provided in this system.
  • To activate this gateway in this system, Admin should crate a Mollie account and should provide it's API details in the system.
  • For Mollie gateway you have to provide mollie key of your account. Note that your details are secure with this system.
  • You can test the payments by enabling the test mode from the system. After the testing, don't forget to turn off the test mode from this section.
  • Also, the admin can enable or disable this gateway from this section. The gateway will not be available for users if it's not activated.

10. Settings

10.1 Currencies


    Currencies:
    Fig.10.1 Currencies
  • User can add, edit or delete currencies from currencies page.
  • They can see the list of available currencies by clicking on Currencies link provided in the panel.

10.1.1 Add/Update Currencies


    Add Currencies:
    Fig.10.2 Currencies
  • The admin can add, edit the currencies by clicking on curresponding links provided in the Currencies page.
  • They should provide currency code as per the standards and prefix of the currency from this page.

10.2 Billing Address


    Billing address page:
    Fig.10.3 Billing address page
  • The admin should update their billing address in settings before sett-upping the gateways.
  • They have to provide the name nd contact details from this page.
  • Note that while adding the billing address, you have to provide country that accepts USD currency (Must not be India).

  • Update billing address:
    Fig.10.4 Update billing address

10.3 Add a Language


    Languages:
    Fig.10.5 Languages
  • It is a multilingual system.Admin can add a language to the system by the help of developers.
  • For that, first of all you have to add the language name and language code from Add language option in settings section.
  • Not that the name of the language must be entered in the same language. Example: English, Deutsche..
  • Also, the language code must be a two letter keyword based on ISO 2 letter (Alpha-2 code, ISO 639-1) standerd.
    Eg: en for English. Reference: Language codes.
  • After that, you have to contact the developer team to set up the translation file.

11. Profile

Admin profile:
Fig.11.1 Admin profile

The admin can view or update their profile from the profile section. They can update their user details and login password from here.